| Properties of an element in the Composer |
For each morph added, a horizontal ‘bar’ is displayed in the Composer as shown here. To choose a morph, click on the ‘bar’.
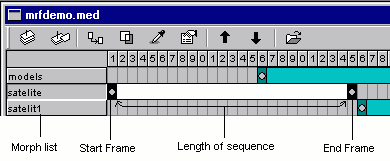
A sample screenshot of a Composer Window
The properties of an element in the Composer are:
The starting and ending frames:
These are the frames in the output movie within which this morphing sequence will be visible. You can directly change them by altering the start & length of the ‘bar’ for this morph in the composer (but beware! you can only reposition the 'bar' but not change its length, if the element is an AVI movie).
The position (x & y) of the morph in the output movie:
You can actually specify a curve along which the morph will be moving in the output movie. The Motion editor is the tool used to specify this, and it can be invoked by choosing the Compose>Motion editor option.
The transparent colour:
If you are having a sequence like a moving ball, you might want only the ball to be visible and the other background to be transparent. To do this, you have to choose the colour of the background and everything except this colour will be included in the output movie. To specify this transparent colour, choose Compose>Transparent colour option. For more details, take a look at the topic Choosing the transparent colour.
The transparency percentage value:
This value is a percentage, which is used to add up all the individual morph sequences into the output movie. If transparency=100%, the morph will appear normal, and if transparency=50%, you can get a ‘glassy’ morph with part of the background also visible through it. The transparency value is specified as a curve, and the tool to specify this curve is the Transparency editor. It can be invoked by choosing the Compose>Transparency option.
Other miscellaneous properties:
These can be set by choosing Compose>Properties option.
The most important property of a morph sequence in the Composer, is its position in the morph list (refer the above figure). You need to order the morphs in the Composer list very carefully. WinMorph creates the output movie by adding the morphs one by one, first to the last. If the first morph in the list is as big as the output movie size, and if it’s transparency value is 100, then the other morphs will not be visible at all! The privileges and properties of each morph sequence are given in the order they are present in the list.
So if you have a background morph, which must be present for the entire output movie, put it last in the list and put the other morphs above it in the list.
You can change the position of a morph in the Composer list by using the menu options Compose>Move Up & Compose>Move Down.
| Related Topics |
Working with the Morph Composer
Motion editor
Transparency editor
Choosing the transparent colour